Industrial Visual Guide
Last updated: May 18, 2026
The visual companion to 04_Industrial.md. Every component illustrated with real wiki icons, four working automation circuits with full step-by-step build walkthroughs, and item-flow narratives showing exactly how items move through each network.
All component images are pulled live from the official Facepunch Rust wiki at files.facepunch.com.
Visual legend
The diagrams below use color coding to show what each port does at a glance.
Component library
Every industrial tool, what it does, when to use it. Real wiki images on the left, port specs on the right.
Storage Adapter
The "tap" that puts a container into the network. Snap onto the side of any container — wooden box, large wood box  , fridge, drop box, even monument-style containers — and that container becomes accessible to pipes.
- Cost: 75 frags
 + 1 gear + 1 wire (WB1
  , research 75 scrap
  )
) - Power: 0 rW
- Counts toward: 1 of 16 in network
One adapter per container side, but you can put adapters on multiple sides of the same box if you need it to feed multiple destinations.
Industrial Conveyor
The decision-maker. Every 5 seconds (server default), it scans containers on its input side and tries to move up to 32 items per stack through to whatever containers are on its output side — but only if those items match its 12-slot filter.
- Cost: 200 frags + 1 gear + 1 HQM
 + 1 wire (WB1 , research 210 scrap )
 - Power: 2 rW continuous
- Filter: 12 slots (items or categories)
- Move rate: every 5 sec, up to 32 items per stack
Empty filter means "let everything pass." Want components in one box and weapons in another? Two conveyors  , two different filters, two output destinations.
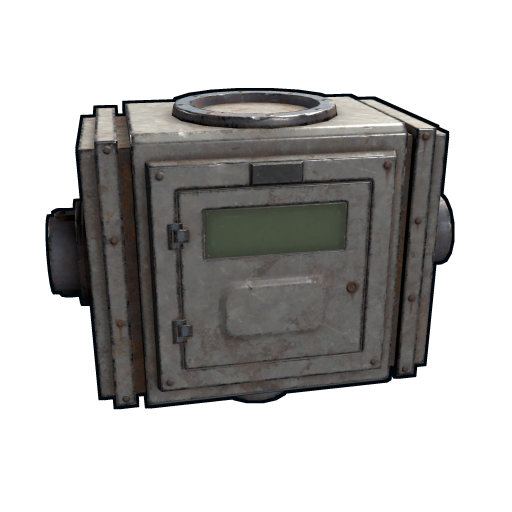
Industrial Crafter
Auto-makes one recipe over and over. Pick any recipe you've researched (gunpowder  , 5.56 ammo
  , syringes
  , bandages
  ), drop it into the recipe slot, and it crafts continuously as long as ingredients are being piped in.
- Cost: 200 frags + 4 gears + 1 HQM (WB2
 , research 250 scrap )
 - Power: 2 rW continuous
- Craft tick: ~5 sec per item
One crafter  = one recipe. Built-in pipe ports — no Storage Adapter needed.
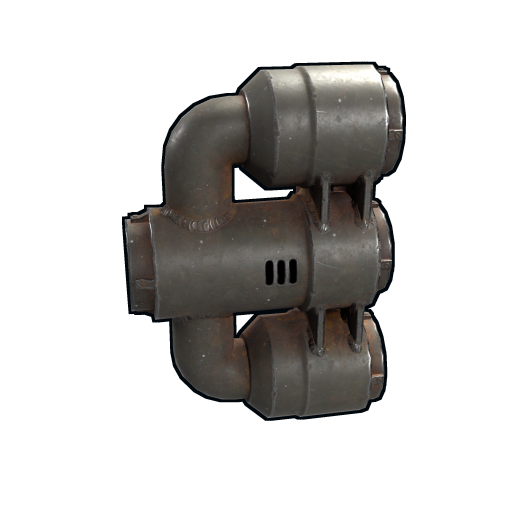
Industrial Combiner
Merges up to 3 pipe inputs into one output. Use any time multiple sources need to feed the same destination. Classic case: recycler has 6 outputs, three combiners  merge them into one pipe.
- Cost: 75 frags + 1 gear (WB1 )
- Power: 0 rW
- Inputs: 3 / Outputs: 1
No power, no setup, no UI. Passive routing.
Industrial Splitter
Sends one pipe input to 3 equal outputs. The combiner 's mirror. Use when you want one stream of items distributed evenly to multiple destinations — for example, splitting one conveyor 's ore output across 3 parallel electric furnaces  .
.
- Cost: 75 frags + 1 gear (WB1 )
- Power: 0 rW
- Inputs: 1 / Outputs: 3 equal
Most networks prefer dedicated conveyors per branch  (one conveyor per destination with its own filter) because that gives per-destination control. Splitter is for genuinely-symmetric fan-out.
Drop Box
One-way deposit container. People on the outside of the wall can put items in; only the owner standing inside can take items out. Perfect entry point for an auto-sort network — teammates deposit loot from outside the loot room.
- Cost: 150 frags (WB1 )
- Slots: 6
- Power: 0 rW
Put a Storage Adapter on the inside-facing side and pipe that adapter into your sort conveyors .
Electric Furnace
Smelts ore using electricity, 66% faster than the small furnace  . Doesn't burn wood
  (wood placed in it sits in the slot). Can't be extinguished by a sprinkler — lives happily next to your greenhouse.
- Cost: 100 frags + 4 gears + 1 HQM (WB2 )
- Power: 60 rW peak (0 when idle)
- Smelt speed: 66% faster than small furnace
Has built-in pipe ports on input and output faces. Pipe in raw ore, pipe out smelted metal/sulfur  /HQM .
Recycler
Converts loot into scrap + base components. Self-powered (no rW). 6 output slots distribute scrap and components after processing.
- Cost (craft): 500 frags + 75 HQM + 2 gears + 1 sewing kit
 (WB3
(WB3  )
) - Power: 0 rW (self-powered)
- Safe zone penalty: -20% yield at Outpost/Bandit
For automation: place a Storage Adapter on the input face, pipe items into it; combine the 6 output slots with combiners into one "scrap and parts" box.
Workbench (1 / 2 / 3)
Research and manual crafting. Not the same as the Industrial Crafter . Use workbenches when you want to research items or hand-craft one-offs.
- WB1 cost: 500 frags + 1 metal pipe

- WB2 cost: 500 frags + 5 HQM + 5 gears + 2 sewing kits
- WB3 cost: 1,000 frags + 100 HQM + 5 gears
- Power: 0 rW
Can be pipe-connected for semi-automated research, but for steady auto-production use the Industrial Crafter .
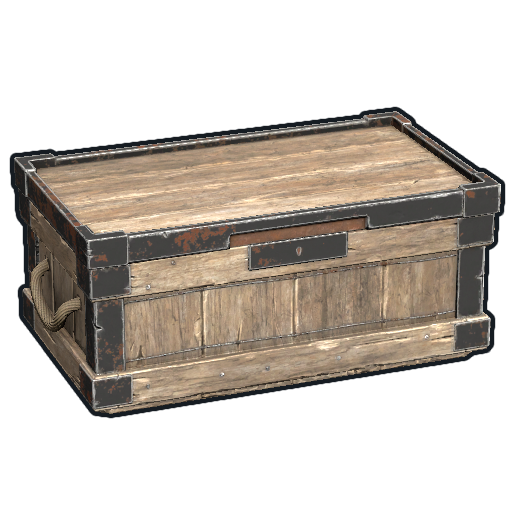
Large Wood Box
The default storage container in any industrial network. 30 slots, accepts adapters on multiple sides.
- Cost: 500 wood
- Slots: 30
- Power: 0 rW
Most boxes in this guide's diagrams are large wood boxes. Small wood boxes work the same way but only have 12 slots.
Electrical Branch
Not industrial per se, but every industrial network needs power. Branch peels a set rW from a main line. Set a branch to "5 rW out" and 5 rW peels off into your conveyor while the rest passes through.
- Cost: 1 HQM (WB2 )
- Power: passes through, no draw
Always prefer a branch over an Electrical Splitter for power distribution. Splitters waste rW; branches deliver exactly what you set.
Connection rules + the 16-adapter network limit
Three rules govern how industrial networks come together.
Industrial pipes  — how they work
Pipes aren't a separate craftable item. You create them by holding the wire tool, aiming at one industrial port, right-clicking, then aiming at another port and right-clicking again. The pipe auto-generates between the two points. Pipes pass through wall frames but not through solid foundations — plan vertical pipe runs around foundation pieces.
Recipe 1 — Drop-Box Auto-Sort
The single most useful network. Drop a backpack of mixed monument loot into one box at your front door; 30 seconds later it's distributed across category boxes in your loot room.
Parts needed: 1 Drop Box, 5 Storage Adapters, 4 Industrial Conveyors , 4 Large Wood Boxes, 1 Electrical Branch (8 rW).
Build steps
- Mount the Drop Box into your front-door wall in a frame. The deposit slot ends up outside; inventory side faces in.
- Adapter on the Drop Box. Stand inside, look at the inside-facing side, place a Storage Adapter.
- Place 4 destination boxes in a row along an interior wall. Adapter on each one's pipe-facing side.
- Place 4 Industrial Conveyors between the drop box and the destination boxes — one per category.
- Run pipes with the wire tool: drop-box adapter splits to each conveyor 's input port; each conveyor 's output to its destination box adapter.
- Wire power. Take 8 rW off your main battery via an Electrical Branch .
- Set the filters. Open each conveyor (look + E), drag categories into filter slots:
- Conveyor 1: Components category
- Conveyor 2: Weapons category
- Conveyor 3: Resources category
- Conveyor 4: leave filter empty (catchall)
- Test: dump mixed loot into the drop box. Within ~30 seconds items appear in correct destination boxes.
Item journey example
You return from a Power Plant run with 15 Tech Trash, 3 Rifle Bodies, an MP5, and some sulfur. You deposit everything into the Drop Box from outside.
- t=0s: items in drop box, conveyors haven't ticked yet
- t=5s: all four conveyors tick simultaneously. Each scans the drop box.
- Conveyor 1: sees Tech Trash
 (Components category, matches). Grabs all 15. Pushes to Components Box.
 - Conveyor 2: sees Rifle Bodies + MP5
 (Weapons category). Pushes to Weapons Box.
 - Conveyor 3: sees Sulfur (Resources). Pushes to Resources Box.
- Drop box empty. Conveyor 4 (catchall) has nothing to grab.
Total elapsed: 5 seconds. You took zero clicks to sort.
Pro tip: Use category filters over specific-item filters where possible. Categories auto-catch new items added in patches; specific filters only catch what you typed.
Recipe 2 — Auto-Smelt Furnace Bank
Dump raw ore into an input box, walk away, return to find ingots in an output box. Electric furnaces never run out of fuel and smelt 66% faster than the small furnace .
Parts needed: 2 Large Wood Boxes (ore in + ingots out), 2 Storage Adapters, 2 Industrial Conveyors , 1 Industrial Splitter , 1 Industrial Combiner , 3 Electric Furnaces , 2 Electrical Branches (4 rW for conveyors , 180 rW for furnaces ).
Build steps
- Ore Input Box at the left side. Adapter on the side facing the input conveyor .
- 3 Electric Furnaces in a row. They need clearance on input + output sides. No adapter needed (built-in ports).
- Ingots Output Box on the right. Adapter on the side facing the output conveyor .
- Input Conveyor between ore box and splitter. Filter: Metal Ore, Sulfur Ore, HQM Ore (so wood /junk gets ignored).
- Industrial Splitter right after the input conveyor 's output. Splits 1 pipe to 3 furnace inputs.
- 3 small pipes from splitter outputs to each furnace input.
- 3 pipes from each furnace 's output into the Industrial Combiner . Combiner output to the Output Conveyor 's input.
- Output Conveyor with empty filter (everything passes — only ingots arrive).
- Pipe from Output Conveyor 's output port to the Ingots Box adapter.
- Power: 4 rW branch for 2 conveyors . 180 rW branch for 3 furnaces (60 rW each).
- Test: dump 100 metal ore. Within 30 sec ore distributes across 3 furnaces and smelts. Ingots accumulate in output box.
Pro tip: Electric furnaces are sprinkler-proof, so this rig can sit next to your greenhouse. They also don't take wood as fuel — filter mistakes don't burn up wood.
Recipe 3 — Auto-Craft Chain
Two industrial crafters in series: first makes Gunpowder from sulfur +charcoal  , second makes 5.56 ammo from gunpowder+frags .
Parts needed: 4 Large Wood Boxes (2 ingredient + 1 buffer + 1 final), 4 Storage Adapters, 2 Industrial Conveyors , 2 Industrial Crafters , 1 Industrial Combiner .
Build steps
- Sulfur + Charcoal supply box. Adapter on side facing Conveyor 1.
- Conveyor 1 between supply box and Crafter 1. Filter: Sulfur , Charcoal .
- Crafter 1 — open its UI, drag Gunpowder into the recipe slot.
- Gunpowder buffer box. Adapters on both sides.
- Pipe: Crafter 1 OUT → buffer box adapter (left).
- Metal Frags supply box. Adapter facing the combiner .
- Industrial Combiner . Two inputs: gunpowder buffer (right adapter) + frags supply.
- Conveyor 2 between Combiner and Crafter 2. Filter: Gunpowder , Metal Frags .
- Crafter 2 — recipe: 5.56 Rifle Ammo .
- Pipe Crafter 2 OUT → final ammo box.
- Power: 8 rW (2 conveyors + 2 crafters × 2 rW each).
- Test: dump 100 sulfur + 30 charcoal + 50 metal frags . Within 5 min, 5.56 ammo accumulates.
Pro tip — feed ammo directly to a turret  : Replace the final ammo box with an Auto Turret . The turret's ammo slot accepts pipe input. Your turret reloads itself every 5 seconds from your sulfur stockpile.
Recipe 4 — Auto-Recycler
Dump unsorted loot into a "to recycle" box, get scrap and components out the other side.
Parts needed: 2 Large Wood Boxes, 2 Storage Adapters, 2 Industrial Conveyors , 3 Industrial Combiners (to merge 6 recycler outputs), 1 Recycler.
Build steps
- To Recycle box with adapter on side facing Conveyor IN.
- Recycler (WB3 craft: 500 frags + 75 HQM + 2 gears + 1 sewing kit ). Self-powered.
- Conveyor IN between dump box and Recycler. Filter empty (pre-sort what goes into the dump box).
- Pipe: dump box adapter → Conveyor IN → Recycler input chute (top side).
- 3 pair-combiners : outputs 1+2 → cmb1, 3+4 → cmb2, 5+6 → cmb3.
- Final combiner : 3 pair-combiners → 1 final combiner output.
- Conveyor OUT between final combiner and Scrap +Parts box. No filter.
- Pipe Final Combiner OUT → Conveyor OUT → Scrap +Parts box adapter.
- Power: 4 rW (2 conveyors ). Recycler self-powers.
- Pre-filter what you dump in! The recycler destroys weapons, food, tools.
- Test: dump 10 Rifle Bodies. Within 60s, 250 scrap + a few HQM land in the Scrap +Parts box.
Pro tip — chain it with Auto-Sort: Route the Components output box of your Drop-Box Auto-Sort into a SECOND auto-sort that splits "keep" components (Tech Trash , Targeting Computers) from "recycle" components (Sheet Metal, low-value). Pipe the "recycle" branch into the To-Recycle dump box. Monument loot now fully processes from drop-box deposit to scrap stockpile with zero clicks.
Power budget summary
Build all four recipes and run them off one large battery.
| Network | Conveyors |
Crafters |
Furnaces |
Continuous | Peak |
|---|---|---|---|---|---|
| Drop-Box Auto-Sort | 4 × 2 = 8 rW | — | — | 8 rW | 8 rW |
| Auto-Smelt Furnace Bank |
2 × 2 = 4 rW | — | 3 × 60 = 180 rW | 4 rW | 184 rW |
| Auto-Craft Chain | 2 × 2 = 4 rW | 2 × 2 = 4 rW | — | 8 rW | 8 rW |
| Auto-Recycler | 2 × 2 = 4 rW | — | — | 4 rW | 4 rW |
| All together | 20 rW | 4 rW | 180 rW | 24 rW | 204 rW |
204 rW peak is manageable: one wind turbine  at full elevation (150 rW peak) + 2-3 solar panels
  + one Large Battery covers it during daylight. At night, skip furnace runs; the 24 rW continuous load runs ~17 hours off a full large battery.
Common mistakes
| Mistake | What happens | Fix |
|---|---|---|
| Connecting two conveyors directly via pipe |
Items sit idle | Put a container with adapter between them |
| Empty filter when you wanted to block | Everything passes | Don't connect the conveyor or cut its power |
| Forgot to power a conveyor |
Items sit in input box | Every conveyor /crafter needs 2 rW |
| Splitter where a Branch was correct |
Wasted power | Industrial Splitter for items, Electrical Branch for power |
| Filter category contains items you wanted excluded | Junk in your good box | Use specific-item filters for fine control |
| Exceeded 16-adapter limit | New connections fail or items stop | Split into two unconnected networks |
| Industrial Crafter has no recipe set |
Crafter sits idle |
Open crafter UI, drag in the recipe |
| Wood in the ore box |
Furnace input fills with wood |
Filter input conveyor to ore types only |
| Recycling weapons by accident | Lost the weapon | Pre-sort before recycling |
| Pipes won't connect through a foundation | Pipe-tool shows red | Pipes pass through wall frames only |
For mechanics deep-dive, see 04_Industrial.md. For powering this rig, see 03_Electricity.md. For where this network lives in your base, see 02_Base_Designs.md.